Harvesting & Storing
THE “INSURANCE” CROP
In view of the potato shortage this year, we should take extra care in harvesting and storing our own crops so as to avoid any risk of loss.
The tops should be cut down and removed about a fortnight before lifting time—burn them if there is the slightest suspicion of blight. Choose a fine day for lifting and leave the tubers on the ground just long enough to dry—about four or five hours.
Be careful to sort your crop, to make sure that you don’t store any diseased tubers. But even with the most careful sorting, a diseased tuber or two may accidentally get mixed with sound ones. So to prevent disease spreading, sprinkle powdered lime, or a mixture of lime and flowers of sulphur, among the tubers. The sulphur also helps to keep vermin away.
Potatoes are easily damaged by even a few degrees of frost, and are then unfit for human food. If you store your crops in boxes or barrels, rather than in sacks—and line the containers with old newspapers as a protection against frost. Put the boxes or barrels in a dry, frost-proof shed for the winter and cover them with old sacking, giving extra covering in severe weather.
Label your varieties and use the poorer keepers first; for instance, Arran Banner should be used before Arran Peak. Be careful about ventilation particularly in the first months of storage; the door should be kept open, also the window when the weather permits.
Look over your stored potatoes fortnightly and remove any diseased tubers.
If you have a large crop and want to store them in a clamp or pie, this diagram may help you in building it.
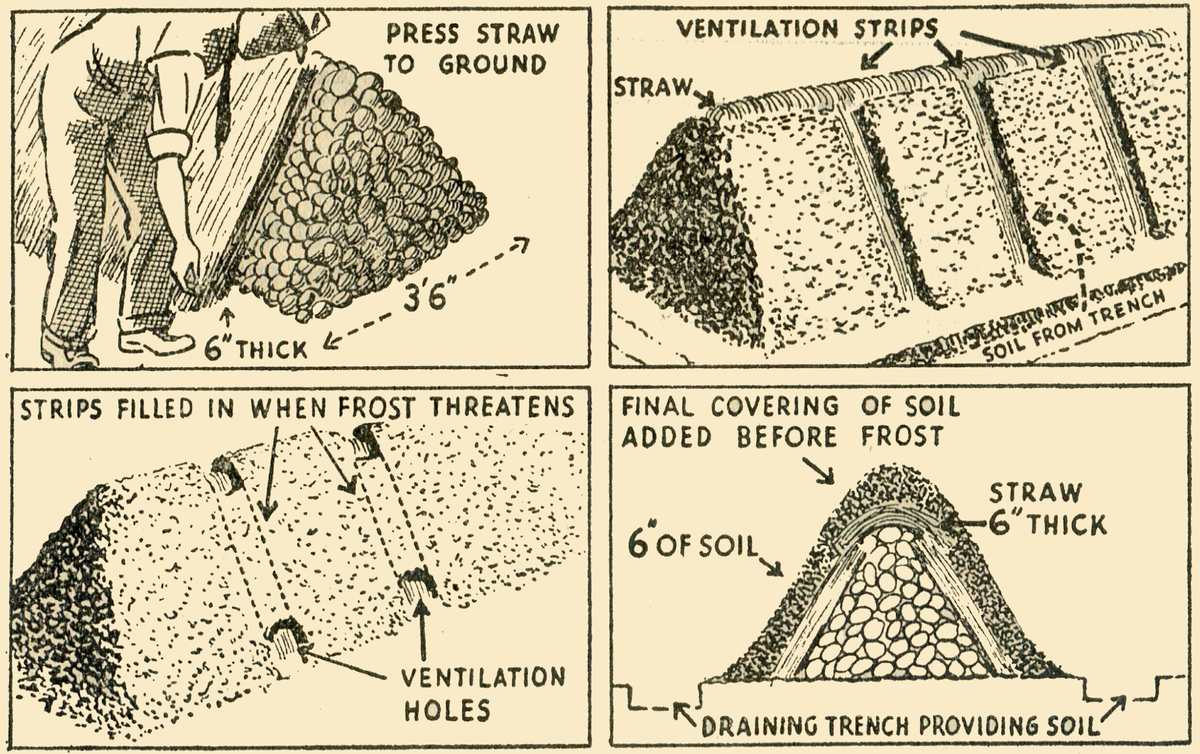
Choose the driest bit of your land for your clamp and mark out a strip 3 ft. 6 in. wide and long enough to take your crop.
Don’t be niggardly with the straw —provide at least a 6-in. layer. Press the lower ends of the straw close to the ground, for it is along the edge of the clamp that the frost generally creeps in.
The straw layer should reach almost to the top of the potatoes. You then put a covering of straw over the top of the ridge, so that its ends overlap the straw at the sides. This ensures that the rain runs down the outside and not into the clamp. To keep the straw in place, put some soil along the lower edge and a spadeful here and there over the whole of the straw covering.
Allow a few days for “perspiring,” and then cover most of the straw (to within 4 in. of the top of the ridge) with 6 in. of soil, leaving 6 in. strips bare every so often. To get this soil, dig a trench 1 ft. away from the base of the clamp, about 6 in. deep. Cut an outlet in the trench to make sure that all water drains away.
When frost threatens fill in the bare strips with soil and also cover the ridge. But make ventilation holes at intervals at ground level and along the top of the ridge. Stuff these holes with straw to prevent them getting blocked with soil.
If your clamp seems to be all right, you may leave it undisturbed until February, if you like. But you should then open it when it is not freezing and inspect the contents, removing any diseased tubers and “sprouts.” In remaking the clamp, take care not to bruise the potatoes, or rotting may set in.